|
|
|
|
Postwar Bakelite Radios: Firestone 4A-27 Restoration
|
| |
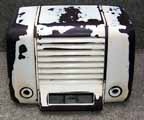
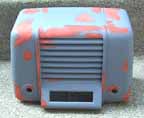
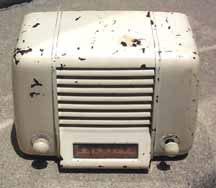 I picked up this radio quite cheaply off e-Bay. I will sometimes bid
on an item that needs "help", just because the opening bid is so low.
Sometimes, I win the item, which was the case with this Firestone radio.
As you can see, the paint is in poor shape, and there was a very tight
crack on the case, with a large chip out. The knobs do not match - the one
on the right is too small.
This radio does not work at all, so it will need to be electronically
restored as well as cosmetically.
I picked up this radio quite cheaply off e-Bay. I will sometimes bid
on an item that needs "help", just because the opening bid is so low.
Sometimes, I win the item, which was the case with this Firestone radio.
As you can see, the paint is in poor shape, and there was a very tight
crack on the case, with a large chip out. The knobs do not match - the one
on the right is too small.
This radio does not work at all, so it will need to be electronically
restored as well as cosmetically.
Cabinet Restoration
|
|
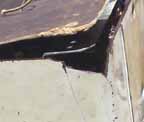
Detail of Chip
|
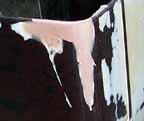
I began the restoration of this radio by removing the knobs, chassis,
and the dial glass (stored carefully in bubble wrap). As you can see from
the photo on the right, there is a very tight crack in the case which ends
in a large chip out of the case. I spread some 60-second epoxy on the crack,
both from the top and bottom. I made sure to get some epoxy into the crack.
I let the epoxy harden over night. I also epoxied a clear piece of plastic
from a 2-liter soda bottle onto the case to provide a ledge for the
bondo to adhere to.
|
|
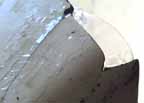
After Epoxy
|
On the left, you can see the edge of the plastic piece which will be
covered in bondo. The epoxy has hardened nicely and the case is now
solid (before, because of the crack, it would flex in your hands).
|
|
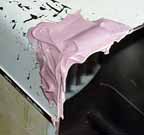
Bondo Patch
|
The photo on the right shows the chip area with a coat of bondo slathered
on. This is too much bondo, but I will "knock it down" before it hardens
completely. The idea here is to get enough on that you won't need a second
coat - so make sure it extends past the edge of the case, if possible.
That way, when sanding it down, you make sure to get a nice even edge on the case.
|
|
After Sanding
|
Once the Bondo had cured (I usually let it set overnight), I needed to sand
it down to match the case, as well as sand down the chipped paint. This time,
I tried something new - I used my orbital sander to do it. I started with
180 grit, then finished with 400 grit paper. Per the photo on the left, A LOT of the old paint came
off, which was OK, since I'm repainting.
|
|
Bondo Patch
|
The bondo patch sanded down quite well, and once it is painted, you won't be
able to tell that a repair was done. I'll sand it from the inside, as well, and then
prime the inside of the case, making the repair almost invisible. Any
imperfections which may show up after priming can be covered with glazing putty.
|
|
Priming...
|
At this point, the case was cleaned off (lots of dust), and it is ready
for priming. I always prime my cases, so that I can see if there are any
areas which need work. The primer also gives the topcoat a good base
to adhere to. The photo on the left shows the case being primed. I just
use a generic Krylon primer, and I tend to put it on pretty heavy (but
not so heavy that it runs!)
|
|
Glazing...
|
Once the radio is primed, take a close look at it under a good light
(outside in bright sun is best). Typically, you will see some areas
where paint chips were not sanded well, or dings show through, etc.
On these areas, I like to just spread a little glazing putty, which
dries quickly and can be sanded. This orange material goes on quite
easy (see photo on the right).

|
|
More sanding...
|
Once the glazing putty dries (maybe a couple hours), I then sand down
the glazing putty (220 - 400 grit paper), working the areas of trouble so that any chips or
marks won't be visible. This round of sanding will likely take you through
the primer you put on before, but that is ok. You'll prime again after
this step. In the photo on the left, we've sanded down and this radio
is ready to prime again. Use a tack cloth to get up all the dust, then
prime again. This cycle can be repeated until you see no flaws in the primed
radio, and because both glazing putty and primer dry quickly, you can do several
cycles in one day.
|
|
Painting
|
On the right, we've begun to paint. This radio is being sprayed with
Krylon's Antique White, which is a good match for many white radios.
I'm laying the paint on pretty thin, but this is because I'm never a good
judge of when paint is about to run. I've sanded too many paint runs
in my day, and I don't want to do any more. You can get good results
by painting horizontal surfaces with a thick layer, but since we'll be
rubbing this finish out, I'm going with thin coats.
|
|
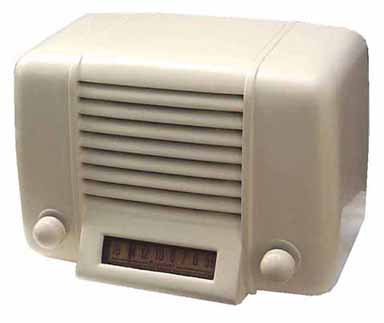
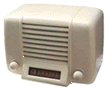
It's done - click for larger photo
|
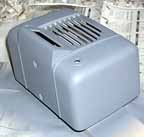
The photo on the left shows the completed radio. After one week, the
radio was wetsanded with 400 grit paper, then 1500 grit. The radio was
then polished with Novus #2. A spare knob was procured and both were
repainted to match the new paint color. The chassis was re-installed.
|
|