|
|
|
|
Other Radios - Wood Tabletop: DeWald 701 Restoration
|
| |
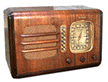
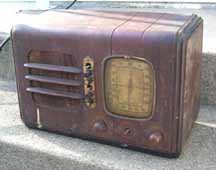 I purchased this DeWald on e-Bay in the spring of 2002 for $28.95. The radio
was in poor shape, and I had purchased another one for parts in the past. The cabinet
on this example looked like it could be saved, and I liked the style a lot.
When the radio arrived, it was not too bad - the case was separating, but all
the wood and veneer were there. It would need to be stripped, joints re-glued,
and refinished. One knob was missing, as well as a couple pushbuttons.
I purchased this DeWald on e-Bay in the spring of 2002 for $28.95. The radio
was in poor shape, and I had purchased another one for parts in the past. The cabinet
on this example looked like it could be saved, and I liked the style a lot.
When the radio arrived, it was not too bad - the case was separating, but all
the wood and veneer were there. It would need to be stripped, joints re-glued,
and refinished. One knob was missing, as well as a couple pushbuttons.
Electronically, I did not even bother messing with it. This is a 7 tube set
with a ballast tube. The ballast looked
to be in poor shape, but I do have a spare parts chassis so hopefully I can make
one good working radio from the two chassis.
Cabinet Restoration
|
|
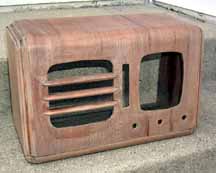
After stripping
|
As you can see from the photo above, the finish on the radio was not good. The
lacquer was in poor shape, and there were paint splatters on the case. A careful
examination of the case showed that the front and top were walnut, the sides were
a cheaper, toned wood, and the transitions between the two were toned darker for
contrast. I stripped the radio with my old favorite, Parks refinisher and 000
steel wool. It didn't take much to get the old finish off this junker. I also
lightly sanded the case afterward to make sure there were no steel wool fibers or
globs of stripper left over.
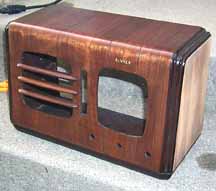
The case was not stable, so it was reglued. Some of the wood had come out of the
joint area, and this was filled with wood filler. This area would be toned darker
than the rest of the case anyway, so the repair could be hidden quite easily.
Once repaired, the case was stained, and a top coat of clear laquer was put on. I then
taped off the trim and toned it with a dark walnut toner, to approximate the
dark brown trim. I also lightly toned the sides so that they would match the
rest of the radio. I applied a DeWald decal to the front, and got ready to
spray the final coats of laquer.
|
|
Redo the side...
|
Unfortunately, one of the sides did not look quite right. It was too dark. I went
ahead and took the finish off that side to try again (see photo at left). I refinished
this one side, so that it matched up better. I don't mind redoing work when the
goal is perfection! It turned out much better the second time.
I shined up and reattached the brass pieces around the dial and pushbuttons.
The lacquer was left to cure for a week, then rubbed out with a combination of
fine grits of sandpaper and lemon oil. A new grille cloth was ordered from
grillecloth headquarters, and installed on a cardboard backer with 3M spray
adhesive.
A matching knob was located to complete the set. The spare chassis had enough
pushbuttons on it to complete one full set between the two.
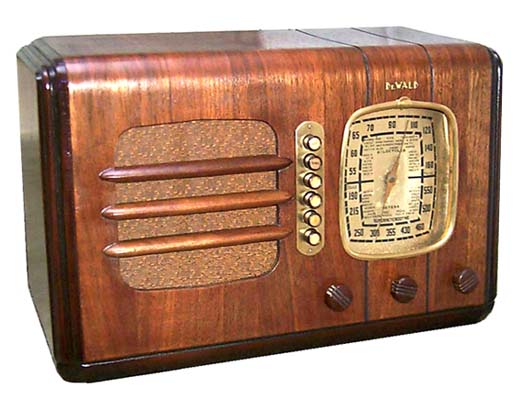
This radio turned out quite
well!
|
Finished Radio
Click for a larger picture
|
Electronic Restoration
Replacement capacitors are on order....
|
|