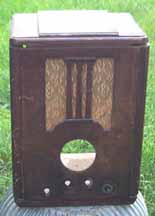
 I bought one of these Delco 1106 radios about a year ago. I bought
another a couple months ago. Both needed lots of work, so I sort of
combined them into one, complete radio. The cabinet on the left
is the better of the two. The veneer was OK, but the top was loose
and the case needed refinishing. The radio has a couple walnut panels,
one on the top and one on the front. The rest is cheap wood which
was toned to match. It is often tricky getting these colors to match
properly. The grille cloth on both radios was good, and I had four knobs
between the two.
I bought one of these Delco 1106 radios about a year ago. I bought
another a couple months ago. Both needed lots of work, so I sort of
combined them into one, complete radio. The cabinet on the left
is the better of the two. The veneer was OK, but the top was loose
and the case needed refinishing. The radio has a couple walnut panels,
one on the top and one on the front. The rest is cheap wood which
was toned to match. It is often tricky getting these colors to match
properly. The grille cloth on both radios was good, and I had four knobs
between the two.
|
|
After stripping
|
Neither chassis seemed to work, though one seemed to have a bad bandswitch.
I decided to use the other chassis for restoration based on that fact.
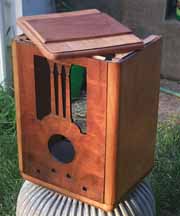
Cabinet Restoration
The lacquer finish on this radio was in poor shape. The toned lacquer
areas were scratched, and the lacquer was flaking off. The front and top
were ok, but the entire radio needed to be stripped. The top of the radio
was almost off already, so I removed it for stripping. I stripped the
case with Parks refinisher and 000 steel wool, gently removing the old
lacquer finish. The stripped radio is shown on the right.
|
|
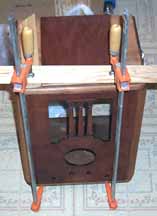
Clamping the top
|
The top needed to be glued back down. It was warped, so I did it in
two evenings. First, I attached the front, glued, and clamped (see photo
at left). The next
night, I did the back. Once the top was re-attached, I could tone the
lighter woods.
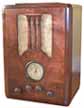
I masked and papered off the real walnut, and toned the rest of the
case using Behlen Master Toner Brown. I really like this stuff - I went
through an entire can, but the resulting finish was superb. When I removed
the paper and tape, I then stained and lightly toned the walnut sections
to match the rest of the case. Once I was happy with the color, I
added a couple of layers of clear nitrocellulose lacquer for the final
coats. I re-installed the dial glass and the grille cloth, then re-installed
the restored chassis. A photo of the complete radio is on the left.
|
It's done!
Click for a larger picture...
|
Electronic Restoration
After recapping the radio, I still had no reception. My oscillator was
not operating, and tracing some voltages around (with help) showed me that
the oscillator coil was open. I swapped one in from the other chassis, and
I had stations on the AM band! However, I still had nothing on shortwave.
As it turns out, the shortwave band's oscillator coil was also bad. In hindsight,
I picked the wrong chassis to restore! However, once the radio was complete,
it sounded great and works very well.


