|
|
|
|
Postwar Bakelite Radios: Bendix 636 Restoration
|
| |
|
|
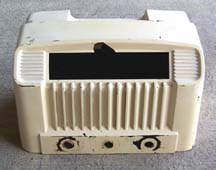
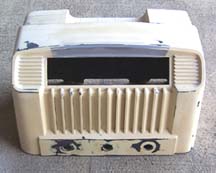
Bendix radio as found
|
I purchased this Bendix radio at an antique mall that was closing down
for $7. It had been there awhile, and you can see why. There is a large
chip out of the case right on the front. When I first saw it, I figured
that there was no way that something so awful could be fixed. Later,
when it was much cheaper, I decided to buy it just for the heck of it.
Usually if I see a radio that cheap, I'll buy it just for the parts. So,
this one sat around for awhile. It was only after I had done some body
work on my old Honda Prelude that I thought I might be able to fix this
radio case in the same way, with auto body filler. Electronically, I was
pleased to find that the radio did work. So, it would just be the case
that needed major attention.
After removing the chassis, I took a closer look at the case. The chip
had broken off quite cleanly. I figured I could support the area
from behind, then fill in the missing area with bondo. I glued a small
piece of clear plastic behind the chipped out area. This took a little
work. My first 3 tries (all variants of super glue) did not hold to the
bakelite. Eventually, I tried a 60-second epoxy from Ace Hardware, which
worked. Once that had hardened, I had a clear piece of plastic behind
the chip which the bondo could adhere to (Bondo does not adhere well
to bakelite).
|
|
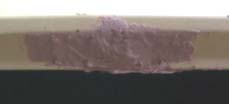
bondo
|
|
|
Before sanding
|
I slathered a layer of bondo onto the clear plastic, careful to not
put too much on. With too much bondo, I would spend all day sanding it
back down. While the bondo was hardening, I scraped and molded it a bit
so that it fit into the area of the chip better. The photo to the right
shows what the bondo looked like after hardening. Once the bondo had
hardened, I sanded it down, starting with a coarser sand paper and
working down to a finer grade. Eventually, the patch began to take shape.
|
|
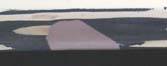
After sanding
|
The photo to the left shows what the area looked like after the bondo
had been sanded down. As you can see, the patch fits the area quite
nicely. Once the patch was sanded down, I primed the area with a coat
of gray primer. This helped me to see if there were any rough spots,
dings, or areas which needed more touch up. There were. Using glazing
putty, I touched up a few minor blemishes in the patch. Once that was
done, I primed the area again to see how it looks. This is a process
you can continue to do until the patched area looks perfect. Because
both the glazing putty and the primer dry quickly, you can easily go
through several patch/prime cycles in one afternoon.
|
|
Sanded and ready for priming
|
The photo to the left shows the patched area after being patched and
primed several times. At this point, I also have sanded down the rest
of the case. There were a ton of paint chips on the case, so I carefully
sanded and smoothed them out. The areas on the front around the three
knobs were especially bad.

|
|
After priming
|
Once these areas were all sanded down, I
decided to prime the entire case (photo on right). This would show me if there were
any other rough spots before adding the final coat of off-white paint.
After priming the case, it is a good idea to go over it carefully with
a fine grade sandpaper to remove any dust, bumps, etc. Once that is
complete, the radio is ready for the final coat.
|
|
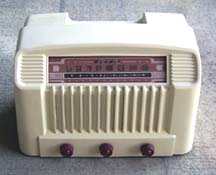
The finished radio
|
The final coat was applied in many thin layers. I used Krylon's Antique White,
and I'm pretty happy with the way this set turned out. I think the original
paint may have been more of an almond color, but I like the way this looks.
After finishing the painting of the case, I cleaned the dial glass very carefully.
The glass was painted on both sides, so I wanted to make sure to protect the paint.
I cleaned it with water, and used a razor blade to get some grime off of the edges.
Then, I cleaned up the knobs (they appear to be a maroon catalin), and put the
radio back together.
Electronically, the radio worked as found. I haven't done any work to it, but
I may replace the old capacitors at some point to ensure good performance for a
long, long time.
|
|


