|
|
|
|
Other Radios - Wood Tabletop: Crosley 5V2 Restoration
|
| |
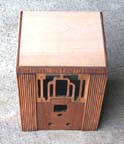
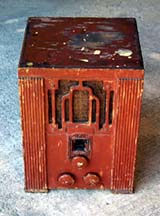 I picked up this old Crosley basket case at a local antique mall. As you can see, the radio has
been painted brown. There are also some yellow paint splatters on the radio, no doubt from
being parked in a room that was being painted. I seem to be attracted to the real basket cases. I
won't even be able to work on this one until next spring, as it's not really warm enough to work
outdoors now. With a lot of work, this tombstone could be a really nice looking radio. The wood
seems to be in decent shape, and the grillecloth is great. Also, the knobs are not original.
I picked up this old Crosley basket case at a local antique mall. As you can see, the radio has
been painted brown. There are also some yellow paint splatters on the radio, no doubt from
being parked in a room that was being painted. I seem to be attracted to the real basket cases. I
won't even be able to work on this one until next spring, as it's not really warm enough to work
outdoors now. With a lot of work, this tombstone could be a really nice looking radio. The wood
seems to be in decent shape, and the grillecloth is great. Also, the knobs are not original.
Electronically, the radio emits a loud shriek when powered on. I see that the
tube shields from three of the tubes are missing, so I am guessing that this
is what is causing that problem. Once I have some new shields in place, I can
power it up again and take a closer look.
Cabinet Restoration
|
|
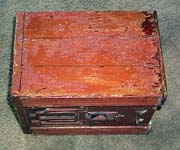
Stripping one side
|
As you can see from the photo above, the finish on the radio was a complete disaster.
The only choice was to strip off the brown paint which had been slapped on in a real
haphazard way. I stripped the radio one surface at a time, using Citri-Strip. I
slathered the stripper on, and gave it 15-20 minutes to soak in. It lifted the
brown paint right off. To my surprise, there was also a coat of green paint under
the brown, so this radio had been painted twice! The photo to the right shows the
finish being attacked by the Citri-Strip, with the paint bubbling up. You can see
the green showing through near the bottom of the picture.
|
|
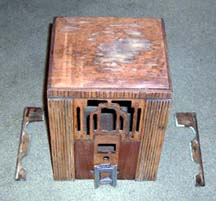
The stripped cabinet
|
The photo to the left shows the radio after being stripped. The chrome dial
escutcheon has been removed and cleaned (it, too, had been painted brown). The
feet of the radio have also been removed to facilitate stripping. I'm amazed at the
wide variety of veneers present on this radio. The front has several different
kinds of wood, including walnut and what appears to be maple. The top strip along
the front of the radio is very deco, but I am not sure what this wood is (it's also
present on my Crosley 167
and Kingston 600B, which date to a similar time). As you
can see, there is considerable water damage to the top of the cabinet. I suspect the
radio may have been placed in an attic or basement where water dripped on the top,
causing the wood to bleach out. I may have to replace this piece of veneer, but first
I will try to resurrect it. The rest of the veneer was in pretty good shape, with
only a few chips here and there.
|
|
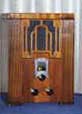
Another 5V2
|
One of the problems with refinishing a radio that has been painted is trying to
make the radio look original, yet you have nothing to work from. At least when
refinishing a lacquered radio, you know what it should look like before you begin.
With a radio that's been painted, you don't have that luxury. Stein's Machine
Age to Jet Age has a picture of a 5V2, but it's in black and white and isn't terribly
helpful. So, before finishing the radio, I began to look for other pictures. I wasn't
able to find one on any site on the Internet, even the Crosley Radios page doesn't
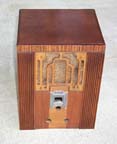
have a 5V2. One day, however, while scanning e-Bay, I saw a 5V2 that came up for auction.
The picture to the right shows the radio that was sold. I don't know if this radio
had an original finish or not, but I decided to use this as my model for the restoration
(I liked the look of it, original or not). It appears that the cheaper wood which forms
the columns, as well as the sides and top, has been stained or toned to match the walnut
panel on the front. The maple area is finished in its natural color. Crosley probably
used toned lacquers to accomplish this.
|
|
With new veneer on top
|
After a bit of work on the top of the radio, it became apparent that I was going to
have to replace the top veneer. The top had severe water damage, and the wood was just
too far gone to save. The top was already separating from other areas, so it was
fairly easy to remove the veneer. In fact, it came off in one piece. Unlike other
veneers, this one was twice as thick as normal. In order to make the new top level
with the ends of the radio, I had to put two layers of veneer down. The first was
an old piece of cherry veneer that I had no use for. Then I put down a nice piece
of walnut on top of it. I then proceeded to stain and lacquer the cabinet. However,
when I was done, I just wasn't happy with the result. The original top (and sides)
were not made of walnut, and the grain of the new walnut veneer on the top just
didn't look right against the grain of the other wood on the sides. I couldn't tell
what kind of wood the original top was made out of, but my guess was birch or
cherry. So, I sort of started over. I removed the toned lacquer that I had already
sprayed on, and lifted the new veneer off the top. Instead of walnut, this time
I used another piece of cherry.
The new veneered top can be seen in the photo on the left.
|
|
After Toning Lacquer
|
After installing the new veneer, I sanded the case lightly and then applied a coat
of stain. Because the top veneer was a different color, I mixed several stains to
get a color that was similar. After the staining, I used toning lacquers on the case.
I used Perfect Brown, and tried to match the top, sides, and columns as closely as
possible. The other front panels which are zebrawood, maple, and walnut, were not
toned. I'm certainly not 100% that this is the correct appearance for this radio,
but I think it's close. The cabinet can be seen on the right, with the escutcheon
and original (but torn) grille cloth installed. The feet are still not present and
need to be lacquered. I still need to come up with three original knobs, as well.
Electronic Restoration
Replacement capacitors are on order....
|
|


